Published on
February 16, 2026


When your business grows, working with vendors becomes inevitable. But every vendor relationship introduces risks - cybersecurity breaches, financial instability, compliance issues, and more. For example, over 60% of data breaches involve third-party vendors, and incidents like the 2023 Change Healthcare cyberattack show how these risks can disrupt entire industries.
To manage vendor risks effectively, follow these key steps:
Managing vendor risks isn’t a one-time task. A structured, repeatable process helps you stay ahead, minimize disruptions, and protect your business as it scales.
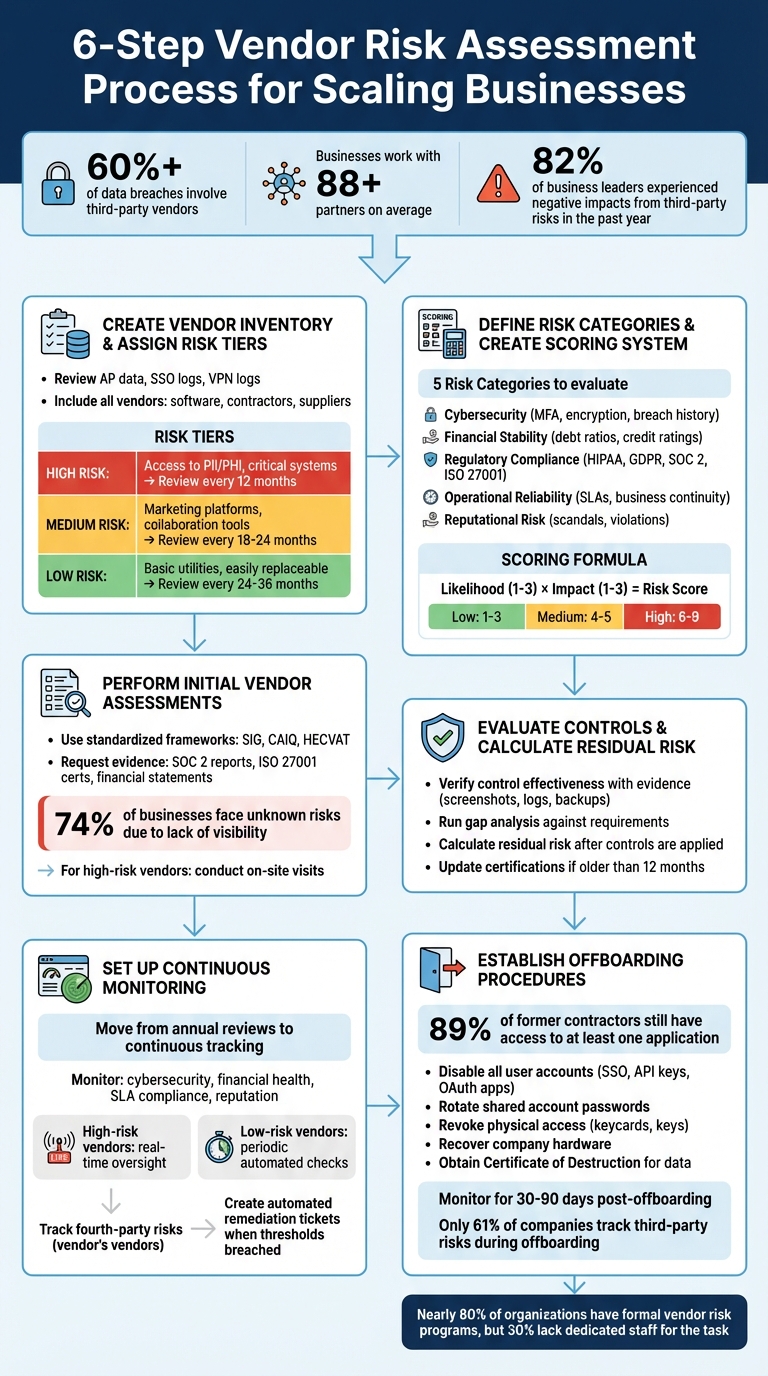
6-Step Vendor Risk Assessment Process for Scaling Businesses
Start by identifying every third-party vendor your organization works with. To do this, review your Accounts Payable (AP) data, Single Sign-On (SSO) logs, and Virtual Private Network (VPN) logs. This comprehensive approach helps ensure you don’t miss any vendors and can even reveal shadow IT - unauthorized tools employees might be using without approval [6][7].
Your list should include more than just software providers. Think broadly: contractors, maintenance services, financial consultants, and physical suppliers all count [5]. On average, businesses work with over 88 partners [6], so it’s crucial to consult department heads to ensure no critical vendors slip through the cracks - especially those with access to sensitive data.
Augustus Arnold from Targhee Security puts it plainly: "You can't manage what you can't see. The first, non-negotiable step is to create a comprehensive list of all third-party vendors" [5].
Once you’ve compiled your list, the next step is to classify each vendor by the level of risk they pose. This will allow you to prioritize your focus where it matters most.
After completing your inventory, sort vendors into high, medium, or low-risk categories. This classification ensures you can concentrate your efforts on vendors that pose the greatest potential impact [6].
High-risk vendors are those with access to sensitive data, such as Personally Identifiable Information (PII), Protected Health Information (PHI), or financial records. They may also support critical systems like ERP or payroll or have privileged access to your internal networks. To determine a vendor’s risk level, ask questions like: “Would losing this vendor disrupt operations immediately?” and “How quickly could we recover?” [8]. For example, a vendor managing PII or PHI will naturally have a much higher risk profile than a company providing plumbing services [2].
Make your inventory as detailed as possible. Include information like the service provided, the internal department that relies on them, the type of data accessed, and how critical they are to daily operations [5][7]. Then, establish regular review schedules based on the vendor’s risk tier. High-risk vendors should be reassessed every 12 months, medium-risk vendors every 18–24 months, and low-risk vendors every 24–36 months [6].
| Risk Tier | Typical Characteristics | Review Cadence |
|---|---|---|
| High | Access to PII/PHI, ERP/payroll systems, privileged network access, critical workflows | Every 12 months |
| Medium | Marketing platforms, collaboration tools, access to non-sensitive internal data | Every 18–24 months |
| Low | Basic utilities, low-access tools, easily replaceable services, minimal business impact | Every 24–36 months |
Once vendors are sorted into risk tiers, it’s time to dive deeper by examining specific risk areas. For most growing businesses, these typically include cybersecurity, financial stability, regulatory compliance, operational reliability, and reputational risk [8].
Ann Snook from Case IQ highlights: "Nearly 80 percent of organizations have a formal program in place for vendor risk assessments, but around 30 percent don't have staff dedicated to the task" [4].
By defining these categories, you can create a framework to measure and compare vendor risks consistently.
A weighted scoring system simplifies vendor evaluation, ensuring consistency and fairness. Start by assigning each risk category a numerical scale (e.g., 1–5 or 1–10) [6]. Then, adjust the weight of each category based on your business needs. For instance, a healthcare company might prioritize data privacy over other risks.
Evaluate vendors on two dimensions: likelihood and impact. Multiply these scores to calculate a composite risk score [9]. For example, if a vendor scores 3 for likelihood and 2 for impact, their composite score would be 6.
| Risk Component | Scale | Numerical Value |
|---|---|---|
| Likelihood | Unlikely / Possible / Likely | 1 / 2 / 3 |
| Impact | Negligible / Moderate / Catastrophic | 1 / 2 / 3 |
| Final Score | Low (1–3) / Medium (4–5) / High (6–9) | Result of Likelihood × Impact |
Set clear thresholds for each risk tier. A common breakdown is 1–3 for low risk, 4–5 for medium risk, and 6–9 for high risk [9]. Share these thresholds with your team to maintain transparency in procurement decisions [6].
This model helps in making data-driven choices, which are critical for long-term stability. Implementing expert growth strategies alongside these assessments can further protect your bottom line. It also allows for calculating residual risk - the remaining risk after a vendor implements necessary controls [8]. If the residual risk is too high, you’ll need to push for stronger safeguards or consider alternative vendors.
Jill Henriques, GRC Subject Matter Expert at Vanta, advises: "Organizations should have repeatable risk criteria that reflect their risk appetite based on impact and likelihood" [10].
Once you've assigned risk tiers and built a scoring model, it's time to gather detailed information from vendors using a structured questionnaire. Start with a standardized framework like SIG for general industries, CAIQ for SaaS providers, or HECVAT for higher education institutions [13].
Tailor the questions based on the vendor's risk tier. For cybersecurity risks, ask about their encryption methods, use of multi-factor authentication (MFA), intrusion detection systems (IDS), and the frequency of penetration tests and vulnerability scans [13]. On the compliance front, request details about adherence to regulations like GDPR, HIPAA, or PCI DSS, and ask for evidence of formal data protection programs and third-party audits [12][13][4]. For financial stability, examine their solvency, ownership structure, and resilience to market changes or currency risks [8][3][4]. Additionally, inquire about their incident response plans, disaster recovery strategies, and how they manage their own third-party suppliers [11][12][13].
"84% of companies reported that the inability to identify, evaluate and prioritize third-party risk has led to operational disruption." - Gartner [11]
A staggering 74% of businesses face unknown risks because they lack full visibility into how third parties handle their data [13]. To address this, insist on evidence-backed responses rather than relying solely on self-reported claims. Request documentation such as SOC 2 reports, ISO 27001 certifications, financial statements, and cybersecurity insurance certificates [13][3]. Remember, questionnaires offer only a snapshot of the vendor's current state, so plan for annual reassessments or continuous monitoring to stay ahead of any changes in their risk profile [12][14][3].
Once vendor responses are in, move to the next step: verifying the details against the submitted documentation.
Now that you've collected questionnaire responses, it's time to validate the evidence provided. Start by checking the scope and currency of certifications like SOC 2, ISO 27001, or PCI DSS to ensure they cover the specific services or data centers your business relies on [16]. Pay close attention to any "exceptions" or "qualifications" flagged by auditors, as these can highlight critical control gaps that may pose risks [16].
Look for proof of implementation - this could include system screenshots, training logs, or results from incident response drills [16]. For financial stability, review documents like balance sheets, tax filings, and insurance policies to confirm the vendor's ability to sustain operations over the long term [15][3]. Cross-check self-reported claims with third-party security ratings or external risk indicators to identify any inconsistencies [15][16]. Additionally, search global sanctions lists, watch lists, regulatory databases, and news reports to uncover any red flags [15].
A real-world example: In July 2024, a failed service update by CrowdStrike caused the cancellation of over 5,000 flights and disrupted 8.5 million computers globally [11]. This incident highlights the critical importance of a thorough documentation review.
"Traditional methods of vendor due diligence rely heavily on manual processes such as collecting questionnaires, reviewing documentation, or performing desk assessments and on-site visits. Because these processes are time-consuming and cumbersome, vendor due diligence assessments can't be processed at a pace that allows for timely vendor onboarding." - BitSight [15]
For high-risk vendors, especially those with access to sensitive data, conduct deeper manual reviews and validate evidence thoroughly. For lower-risk suppliers, automated screening tools can speed up the process [15][16]. For mission-critical vendors, consider on-site visits to inspect physical security measures and hold face-to-face discussions with key personnel [15][16]. Keep all findings in a centralized matrix or spreadsheet to ensure consistent scoring and minimize bias during vendor selection [8][4].
Once you've reviewed the documentation, it's time to ensure that vendor controls actually do what they're supposed to. This means asking for evidence. Screenshots showing active multi-factor authentication (MFA), current patch updates, successful backups, or logging activities can confirm that controls are functioning as claimed [6]. For vendors handling high-risk operations, consider going deeper. Techniques like vulnerability scans, architecture reviews, code reviews, or even authorized penetration testing can provide more clarity [16].
Run a gap analysis by comparing the vendor's controls against known risk areas such as access management, encryption, and backup systems. Mark each control as either meeting requirements, having gaps, or relying on compensating measures [6]. If a vendor can't meet a requirement, assess whether their alternative measures offer a comparable level of protection [6]. Also, if their evidence or audit reports are older than 12 months, request updated versions [6].
For critical vendors, take it a step further with on-site assessments. These allow you to directly observe physical and technical security measures, verify how controls are implemented, and speak with key personnel [16]. Considering that over 82% of business leaders reported issues stemming from third-party risks in the past year [6], this level of scrutiny is essential for businesses looking to grow securely.
A detailed review like this sets the stage for accurately calculating residual risk.
After confirming the effectiveness of vendor controls, it's time to evaluate the residual risk - the risk that remains even after all controls are in place [8]. To do this, start by identifying inherent risks, complete due diligence, verify vendor controls, and then assign a residual risk rating [17]. Subject matter experts (SMEs) play a critical role here, ensuring that the vendor's controls sufficiently reduce the likelihood, severity, or impact of any risks [17].
"The level of residual risk can only be determined after completing due diligence, when a subject matter expert (SME) concludes the review of the vendor's controls and offers a qualified opinion regarding their sufficiency in mitigating the risk." - Hilary Jewhurst, Head of Third-Party Risk Education & Advocacy, Venminder [17]
To make this process consistent, use a weighted scoring model. Assign higher weights to controls that protect sensitive data or critical systems. This model often results in a score ranging from 0 to 100 [6]. Use the same scale for both inherent and residual risks - like Low, Moderate, or High - to keep reporting consistent [17]. Be sure to document your methodology and apply it uniformly across vendors to maintain transparency in your decision-making process.
The final residual risk score will indicate whether the vendor's remaining exposure is within your organization's risk tolerance or if additional measures are needed before moving forward [17][1].
Vendor risk isn't a one-and-done process - it evolves over time. Financial struggles, cybersecurity incidents, or service level agreement (SLA) breaches can drastically change a vendor's risk profile. This is why continuous monitoring has become the go-to approach, replacing outdated annual reviews. To keep up, you need a real-time picture of your vendors' health across key areas like cybersecurity, financial stability, operational efficiency, and reputation [18][19].
"Vendor risk doesn't wait for an annual review, and that's exactly why continuous monitoring for vendor risk management has become a critical operational advantage." - Auditive Team [18]
Start by creating a risk-based monitoring framework. High-risk vendors - those with access to sensitive data or critical operations - should have real-time oversight, while lower-risk vendors can be managed with periodic, automated checks [18][1]. Some regulations, like the Gramm-Leach-Bliley Act (GLBA), even mandate continuous tracking for high-risk vendors, making it essential to go beyond one-time assessments [18].
Keep a centralized record of everything: historical evidence, risk waivers, and remediation activities. This eliminates the chaos of outdated spreadsheets and scattered email chains when issues arise [18]. Set clear escalation triggers too. For instance, if a vendor's credit rating drops below your acceptable threshold or they breach an SLA, the issue should escalate immediately [18]. Pay attention to early warning signs like leadership changes or weakening financials, and adjust your monitoring intensity as needed.
Don’t overlook fourth-party risks either. These are the technologies and services your vendors depend on, which can introduce vulnerabilities of their own [18][1]. By keeping tabs on these interconnected risks, you'll be better prepared to respond quickly and effectively.
When a new risk pops up, don’t let it linger. Document its root cause, assign someone to handle it, set a deadline for resolution, and track the issue until it’s closed [18]. Technology can help streamline this process. For example, when a risk threshold is breached, platforms like Jira or ServiceNow can automatically generate remediation tickets, complete with asset details and recommended fixes. This reduces manual delays and ensures accountability [18][20].
Take these efforts a step further by embedding risk management practices into your contracts and RFPs. Include clauses that require vendors to adhere to ongoing monitoring and meet specific security standards [20][21][22]. This gives you the legal backing to request updated evidence or conduct follow-up assessments when new risks arise. Additionally, integrate third-party monitoring data into your organization's cyber incident response plan. This allows you to quickly assess the scope of any potential breaches [20][1].
If a vendor can’t resolve a critical issue within your acceptable timeframe, don’t hesitate to activate backup measures. This could mean enforcing stricter controls, securing additional insurance, or even switching to a new provider. Having these contingency plans in place ensures you're ready to act when risks escalate.
When a vendor relationship ends, the work isn’t over. Shockingly, 89% of former employees and contractors still have access to at least one application after their engagement ends [24]. This isn't just a minor oversight - it’s a major security threat. Take AT&T, for example: in January 2023, the company faced a data breach linked to a former cloud vendor. The incident, which occurred years after the contract ended, exposed the data of 8.9 million wireless customers. Why? The vendor failed to delete customer records properly. The fallout? AT&T paid $13 million in FCC fines and had to tighten its data handling policies [23].
To avoid similar disasters, start by immediately disabling all named user accounts. This includes removing SSO and directory entries, revoking guest access in tools like Slack and Teams, and deleting API keys. Don’t forget about OAuth-authorized apps tied to platforms like Salesforce or Google Workspace - disconnect those as well. If the vendor used shared accounts, rotate the passwords for those accounts right away. Simply disabling their primary account won’t block access to shared credentials [23][24].
Physical access is just as important. Deactivate keycards, collect building keys, and revoke parking passes. And here’s a critical point: 77% of machine accounts - like service accounts and API tokens - often go unmanaged, leaving them as potential vulnerabilities once a vendor relationship ends [24].
"An API key works until someone revokes it, regardless of whether the person who created it still has access" [24].
- Claire McKenna, Director of Content & Customer Marketing at ConductorOne
Next, recover all company-issued hardware. This includes laptops, phones, and hardware MFA tokens. Before redeploying these devices, ensure they’re wiped clean.
Verbal assurances aren’t enough when it comes to data destruction. Insist on a formal "Affidavit of Destruction" or "Certificate of Destruction", clearly detailing what was deleted and from which systems [23][24]. Ignoring this step can lead to serious consequences. In 2021, Lexington Medical Center faced a breach when a former vendor accessed archived servers containing protected health information long after the contract ended [23].
"If a former vendor retains data they shouldn't, or if you can't prove it was properly deleted, that's your liability" [24].
- Claire McKenna
By thoroughly securing access points and formalizing the offboarding process, you eliminate lingering risks and strengthen your overall vendor risk management strategy.
Once access has been fully secured, it’s time to document every step of the offboarding process. This ensures nothing is overlooked and provides a record for future reference.
Currently, only 61% of companies track or address third-party risks during offboarding, even though incidents involving third parties cost about 40% more to resolve than internal breaches [2][24]. To close this gap, create a standardized offboarding policy that involves procurement, IT, finance, and legal teams. Be precise: use specific calendar dates for termination and access cutoff instead of vague phrases like "end of quarter." This avoids any confusion or misinterpretation by vendors [24].
Keep detailed records, including termination notices, access revocation logs, and certificates of data destruction. Before cutting access, archive essential data and communications. These records will be invaluable for audits or legal disputes [25][7].
Additionally, update your vendor management database with key details about the vendor’s history, their performance metrics, and the reasons for termination. Implement a "quiet period" of 30 to 90 days post-offboarding, during which you monitor system logs for any unusual activity, such as failed login attempts or unexpected API calls from the former vendor [24]. This precaution isn’t just theoretical - Morgan Stanley learned this lesson the hard way. The company faced a $60 million fine after failing to properly oversee a third party’s decommissioning of servers, which led to a breach [23].
Vendor risk assessment plays a crucial role in ensuring your business's growth and stability. Recent data shows that many breaches stem from third-party vendors, emphasizing the need for a robust strategy to manage these risks effectively [26]. When dealing with a large number of vendors, adopting a tiered approach helps you allocate resources wisely, focusing on high-risk partners while maintaining a clear view of your entire vendor ecosystem.
Following the six-step process outlined earlier - from building a vendor inventory to implementing formal offboarding procedures - turns vendor risk management into a strategic strength [2]. Expanding risk assessments beyond cybersecurity to include areas like financial health, compliance, and operational reliability adds an extra layer of protection for your business. This becomes even more critical as your company grows and faces stricter regulatory requirements from frameworks like GDPR, CCPA, and DORA.
Automating your processes and using data-driven tools can significantly improve efficiency and help your business stay ahead. In fact, over 82% of business leaders reported experiencing negative impacts from third-party risks in the past year [6]. The difference between companies that successfully navigate these challenges and those that struggle often lies in whether they have formal processes in place. While nearly 80% of organizations claim to have vendor risk programs, 30% lack dedicated oversight [4], leaving dangerous gaps in their defenses.
The move toward continuous monitoring instead of annual reviews highlights an important reality: vendor risk is constantly evolving. A vendor’s security posture can shift rapidly due to events like acquisitions, breaches, or changes in their own partnerships. Continuous monitoring and trigger-based reassessments ensure that your vendor relationships remain aligned with your security standards and business goals as they evolve. These proactive measures reinforce the structured approach outlined earlier, helping you stay prepared for unexpected changes.
Start by taking a close look at your vendors' cybersecurity measures, compliance track records, and financial health. These factors play a key role in minimizing potential disruptions to your operations and protecting your company's reputation. Tackling these concerns upfront helps keep your business secure and aligned with regulations as it grows.
To evaluate vendor risk consistently, adopt a structured, risk-focused method that groups vendors based on factors such as data access levels, service importance, and regulatory impact. Create a tiering system to match the depth of assessments to the level of risk. For example, you can use basic questionnaires for vendors with lower risk and conduct in-depth reviews for those with higher risk. Incorporating automation into this process and regularly updating your criteria helps maintain consistency, minimizes mistakes, and keeps your approach aligned with changing risks and regulations.
Continuous monitoring becomes crucial when a vendor's controls, financial health, or internal processes undergo changes. These shifts can bring about new risks, making early detection essential. By keeping a close watch, you can spot potential problems early and take steps to manage risks effectively, ensuring your business remains secure as vendors adapt and evolve.