Published on
March 12, 2026

Time is money when it comes to detecting data breaches. The faster you act, the more you save - and the less damage your business suffers. On average, breaches take 241 days to identify and contain, costing U.S. companies $10.22 million in 2025. Immediate detection can save over $1.1 million and reduce long-term risks. Here's what to watch for:
Key steps to take:
Act fast, document everything, and involve experts. Containing a breach within 200 days can save millions. Regularly update your incident response plan to stay prepared.
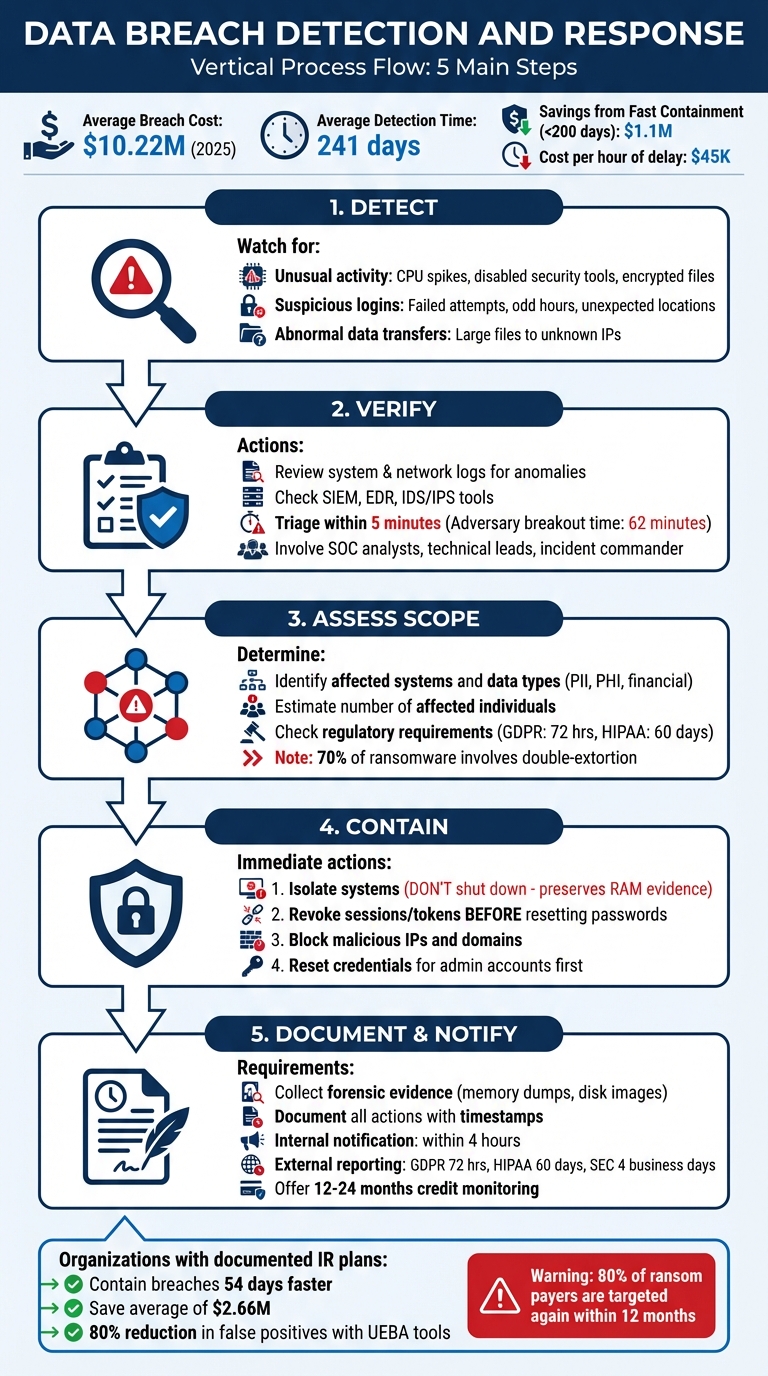
5-Step Data Breach Detection and Response Process
Spotting a breach early often comes down to recognizing subtle red flags. Most attacks don’t announce themselves; instead, they leave behind faint traces in your systems, logs, and network activity. As Sean Harris, Senior VP for Cybersecurity at Intelligent Technical Solutions, aptly puts it, "Something – really anything – out of the ordinary can be an early sign" [8]. The key is knowing what to look for so you can act quickly to verify and contain the threat.
Compromised systems rarely behave as usual. Keep an eye out for sudden performance issues, unexplained spikes in CPU usage, or security tools being disabled without authorization. These could point to malware or unauthorized processes at work [7][9].
Unexpected file changes are another red flag. Missing files, altered permissions, or encrypted files with strange extensions could indicate a ransomware attack in progress [7]. Be wary of legitimate tools like PowerShell connecting to external IPs - this might signal a "living-off-the-land" attack, where attackers exploit built-in tools to evade detection [10]. Similarly, the presence of compressed files in temporary folders could mean someone is preparing data for exfiltration [9].
Login activity often holds valuable clues. For instance, a series of failed login attempts followed by a successful one could be a sign of a brute force or credential-stuffing attack [12]. Geographic anomalies, like a user logging in from two distant locations (e.g., Melbourne and Frankfurt) within a short timeframe, are another red flag [11].
Logins during odd hours - such as a 9-to-5 employee accessing systems at midnight - should raise immediate concern [13]. Other warning signs include access from unknown devices, anonymized networks (like TOR or VPNs), or the sudden reactivation of dormant accounts. If users report receiving unexpected multi-factor authentication prompts, it might indicate an attacker is trying a "push fatigue" attack, where they bombard users with repeated prompts to gain access [14].
Unusual data movement can also signal a breach. Watch for sudden spikes in outbound traffic, especially during off-hours or weekends. Large transfers to unfamiliar IP addresses or the creation of compressed files might indicate staged exfiltration [15].
Sophisticated attackers often rely on gradual data leaks, blending their activity with normal traffic to avoid detection. Be alert to employees accessing databases they don’t typically use, transferring data between corporate and personal cloud accounts, excessive use of screenshot tools, or unusual "Print to PDF" actions. As Kellie Roessler from DTEX Systems notes, "Data theft rarely starts at the perimeter. It starts on the server" [15].
After identifying potential red flags, the next step is verifying the breach to ensure resources are allocated efficiently. As Katie Nickels, Director of Intelligence at Red Canary, explains:
"Many failures are not detection gaps but response gaps; teams see the alert but lack a disciplined playbook" [17].
Your SOC analysts should act quickly, performing initial triage within five minutes of receiving an alert. Their goal is to determine if the indicator is legitimate. Assign a provisional severity level right away - it’s better to adjust later than to waste time waiting for absolute certainty. With the average adversary breakout time now down to just 62 minutes, speed is critical [18].
System logs hold crucial clues for reconstructing events. On Linux systems, check /var/log for entries like "Accepted password" or "Accepted publickey" (successful logins), "authentication failure" (failed attempts), and "sudo" commands, which might signal unauthorized privilege escalation [16]. For Windows environments, focus on security logs for successful logins, failed attempts, and newly created accounts [16].
Network logs often reveal patterns that system logs might miss. For instance, firewall and proxy logs can show "access-list denied" entries or "Teardown TCP connection" records indicating unusual data volumes. Web server logs are also valuable - watch for error codes like 401/403 (failed authentication), 500 (internal errors), or spikes in 404 errors, which could suggest scanning activity. Be especially vigilant for SQL or HTML code embedded in URLs, often a sign of injection attacks [16].
Centralizing logs in a secure location is essential to prevent tampering. Work backward from the discovery time to trace the attacker’s actions and identify the initial entry point. Ensure all systems have synchronized timestamps for accurate analysis [16].
With logs in hand, leverage your security tools for deeper insights.
Security tools are indispensable for speeding up the response process. SIEM platforms, for example, aggregate logs across your network to identify patterns and flag suspicious activity [1]. EDR tools are crucial for detecting malware on devices through behavioral analysis [1]. Meanwhile, IDS/IPS systems monitor traffic for known attack signatures [1].
However, these tools aren’t foolproof. SIEMs and IDS often struggle to detect credential-based attacks since they mimic legitimate logins. In fact, 88% of basic web application breaches involve stolen credentials [1]. This is where dark web monitoring steps in, scanning criminal marketplaces for compromised data. Additionally, UEBA tools can significantly reduce false positives - by up to 80% - by analyzing typical user and network behavior [18].
When a SIEM alert surfaces, cross-check the underlying logs immediately. For EDR alerts, examine process trees and parent-child relationships to confirm malicious intent [17]. Correlating data from multiple sources ensures a clearer picture [16].
Once technical verifications are complete, engage your security teams to add context to the findings. Verification requires collaboration among several specialists:
Collaboration accelerates the validation process. What might seem suspicious to an analyst could be routine activity, clarified by a database administrator.
Organizations with a well-documented and tested incident response plan can contain breaches 54 days faster and save an average of $2.5 million in breach-related costs [5]. It’s also worth considering external DFIR (Digital Forensics and Incident Response) partners. Annual retainers typically range from $15,000 to $50,000, offering response times of 4–8 hours and discounted hourly rates. Without a retainer, emergency engagements cost between $300 and $600 per hour, with weekend rates often 1.5× to 2× higher [6].
Finally, establish out-of-band communication channels that operate independently of your corporate network. Options like a dedicated Signal group or a separate Slack instance work well [4][18]. As Rob Joyce, former NSA Cybersecurity Director, puts it:
"Speed and preparation matter more than perfect prevention" [17].
Once a breach is verified, swift action is essential to meet regulatory deadlines. Statistics show that organizations containing a breach within 200 days save an average of $1.1 million compared to those that take longer [19]. The immediate focus should be on identifying what was compromised and determining the scope of the impact to guide the next steps.
Start by pinpointing the initial compromised asset, often called "Patient Zero." From there, trace the attacker's movement across your network, covering both on-premises servers and cloud environments [6] [19]. It's worth noting that 70% of ransomware attacks now involve "double-extortion" tactics, where data is stolen before being encrypted [6]. This requires a thorough inventory of all affected assets - laptops, servers, USB drives, applications, databases, and SaaS platforms [20] [3].
Next, categorize the exposed data. Was it personally identifiable information (PII) like Social Security numbers, protected health information (PHI), financial records, or intellectual property? These classifications will directly impact your reporting requirements [20] [2] [3]. Also, verify whether the data was encrypted and if the encryption keys were compromised [20]. In cloud environments, check for unauthorized API keys, rogue service principals, or altered OAuth tokens that might allow attackers to maintain access even after being locked out [6].
Isolate systems, but don’t shut them down. Disconnect compromised devices from the network by unplugging cables or disabling Wi-Fi, but leave them powered on. This preserves volatile memory (RAM), which contains critical forensic evidence that vanishes when the system is powered off [2] [6]. Before initiating a restore, confirm the integrity of your backups - 65% of ransomware attacks also compromise backup systems [6].
Use logs and data maps to identify where sensitive information, such as PII and financial records, was stored and determine which datasets were accessible to the compromised systems [21] [22].
Forensic imaging services can help trace the attacker's path and identify what data was exfiltrated [22] [23]. Check if the affected databases contain up-to-date contact information for those impacted - this will be critical for notification efforts [23]. If encryption was fully functional and the keys remained secure, the number of legally impacted individuals could be significantly lower [23].
The average data breach takes 220 days to detect [21], but AI-powered security solutions can shorten the breach lifecycle from 241 days to under 200 days [6]. Document every step with timestamps to piece together a complete timeline of the attack [19].
Reporting obligations depend on the type of data exposed and the location of the affected individuals. Ensure compliance with GDPR, HIPAA, PCI DSS, and relevant state laws, as notification deadlines vary - typically between 30 and 72 hours. For instance, GDPR mandates notification to the lead supervisory authority within 72 hours of discovering the breach [2] [25]. Under HIPAA, organizations must report to the Department of Health and Human Services within 60 days, or immediately if the breach impacts more than 500 individuals [2]. PCI DSS requires notifying payment card companies via your acquiring bank within 72 hours if cardholder data is involved, with non-compliance penalties reaching $500,000 [26].
All 50 U.S. states have breach notification laws, but requirements differ. Thirty-six states (71%) require reports to be filed with the Attorney General or another state agency [24]. As PCICompliance.com explains:
"The reporting clock typically starts when you become aware of the breach, not when it originally occurred" [26].
Identify specific data types, such as biometric or medical information, that might trigger additional state-level requirements [24] [25]. Check whether federal exemptions apply; for example, organizations already adhering to HIPAA or GLBA may be exempt from some state reporting rules [24]. Also, review business contracts for stricter notification timelines than those required by law [20]. Without a structured response plan, organizations face 200% higher regulatory fines and recovery times that are three times longer [25].
Once the scope of a breach is assessed, taking immediate action to contain it is vital. Delays can be costly - each hour can add around $45K in damages, while a well-executed response plan can save up to $2.66M [2][4][27]. The objective here is to block the attacker while preserving the evidence necessary for forensic investigations and compliance reporting.
Disconnect affected devices from the network right away, but avoid shutting them down. Physically unplugging devices prevents further spread of the attack while keeping volatile memory intact for forensic analysis [2][6].
In cloud environments, use tools like security groups or Network Access Control Lists (ACLs) to block both inbound and outbound traffic to compromised systems. For example, in AWS, you can run aws ec2 revoke-security-group-ingress via the CLI to immediately cut access [4]. If you're using endpoint detection and response (EDR) tools such as SentinelOne or CrowdStrike, their quarantine features allow you to isolate infected hosts while still monitoring them through the security console.
On physical networks, managed switches or firewalls can be used to segment affected subnets. This minimizes the risk to production systems. Also, secure server rooms and limit physical access to compromised hardware to maintain the chain of custody. As HackersGhost advises:
"After a breach, most damage isn't caused by attackers - it's caused by rushed decisions" [28].
After isolating devices, focus on securing system access. Revoke all active sessions and tokens before resetting passwords. This sequence is crucial - resetting passwords first can alert attackers, giving them time to escalate privileges or extract data before they're locked out [30][31]. Breaches involving stolen credentials cost an average of $4.67 million and take 246 days to contain [29].
Start by enforcing a global sign-out through your Identity Provider (IdP) or Single Sign-On (SSO) system to terminate all active sessions [30]. In platforms like Azure AD or Microsoft 365, use the "Revoke Sessions" feature to force re-authentication across all devices. Follow this by invalidating OAuth refresh tokens and session cookies, which attackers often exploit to bypass multi-factor authentication (MFA) [29][30].
Before users re-enroll, manually review and remove any suspicious MFA devices, recovery numbers, or authentication apps added by the attacker [30][31]. Rotate API keys, personal access tokens (PATs), and service account credentials as these are often overlooked [30]. Temporarily disable legacy authentication protocols like POP, IMAP, and Basic Auth, which are common entry points for attackers [30].
Prioritize administrative and "break-glass" accounts first, followed by high-risk users, and then the broader affected user base [30]. As TerraZone warns:
"Don't lock the door before you kick the intruder out. Translation: revoke sessions/tokens first, then rotate passwords and keys" [30].
This approach ensures attackers are removed while leaving evidence intact for further analysis.
Identify and block suspicious IPs, domains, and traffic patterns linked to the breach. Network Detection and Response (NDR) tools like Darktrace and Vectra AI, both highly rated by users, leverage behavioral analytics and machine learning to spot and respond to unusual traffic patterns [32][34]. These tools can automatically isolate compromised systems or adjust firewall rules when malicious activity is detected [32][36].
DNS sinkholing is another effective tactic - redirect requests for malicious domains to a controlled, non-routable IP address to cut off communication with command-and-control (C2) servers [35]. Be cautious of dynamic DNS domains like "duckdns.org" or "ply.gg" that aren't explicitly approved by your organization, as attackers often use these alongside reverse tunneling tools like Playit and Ngrok to obscure C2 traffic [35].
For signature-based detection, configure Intrusion Detection and Prevention Systems (IDS/IPS) like Snort or Suricata to block traffic from known malicious sources [33]. With over 90% of network traffic now encrypted [34], modern tools must identify threats within encrypted streams without requiring decryption. Before making network changes, capture running processes and active connections (e.g., via netstat) to document the attacker's activity and preserve evidence.
After containing a breach, timely and clear communication is essential to reduce both legal and reputational risks. Research shows that organizations containing a breach within 200 days save an average of $1.1 million compared to those that take longer [19]. A well-structured notification process can help avoid legal penalties, regulatory fines, and reputational fallout.
Notify your incident response team - including IT, security, legal, and executive leadership - within four hours of identifying the breach. Each group plays a critical role: IT manages containment and preserves forensic evidence, legal ensures compliance and safeguards attorney-client privilege, and executives guide strategic decisions while keeping the Board of Directors informed.
Use encrypted, out-of-band communication channels (not the compromised email system) to coordinate your response. Limit communication to essential personnel to prevent unnecessary speculation or leaks. Provide employees with approved talking points to ensure consistent messaging if approached by external parties.
Public relations and communications teams should draft media statements and internal messages to manage the narrative. Meanwhile, Human Resources should remind employees about confidentiality obligations and restrict external communications. Keep a detailed incident log that records key moments - when the breach was discovered, who was notified, and actions taken by each department.
Once internal communication is secured, shift your focus to implementing the external notification plan.
After informing your internal team, address external reporting requirements promptly. Regulatory timelines vary: notify authorities within 72 hours under GDPR, report to the Department of Health and Human Services within 60 days under HIPAA, and file an SEC Form 8-K within four business days for material cyber incidents [37][38][39].
As InventiveHQ Team explains:
"The 72-hour clock starts when your organization 'becomes aware' of the breach... 'becoming aware' means when you have a reasonable degree of certainty that a security incident has occurred" [39].
Notify affected individuals as soon as the breach is confirmed and its scope determined, typically after regulatory filings. Include the following in your notification:
Avoid using the compromised communication channel for notifications. If contact information for 10 or more individuals is invalid, provide substitute notice via a website posting or major media outlets.
For breaches affecting over 1,000 residents, notify the three major consumer reporting agencies (Equifax, Experian, TransUnion). Under HIPAA, breaches involving over 500 residents of a state must also be reported to prominent media outlets within 60 days.
Prepare notification templates in advance for different jurisdictions to ensure compliance with legal requirements. Offer a dedicated hotline or email along with an FAQ to address questions from affected individuals. To maintain trust and limit damages, provide 12–24 months of free credit monitoring services.
Once the breach is contained, the next critical step is safeguarding forensic evidence and thoroughly documenting every action taken. This ensures you’re prepared for investigations, audits, or potential legal proceedings. Acting quickly to preserve evidence can significantly reduce legal and regulatory risks.
Avoid powering down compromised systems. Shutting down or rebooting a system erases volatile memory (RAM), which holds valuable information such as running processes, encryption keys, and active network connections [2]. Instead, isolate affected systems by disconnecting network cables or disabling wireless adapters. This prevents further spread of the breach while keeping evidence intact.
Capture a complete picture of the breach by creating bit-by-bit forensic images of hard drives and memory dumps before beginning cleanup efforts. These snapshots can uncover critical details like deleted files, metadata, and slack space [2]. To protect sensitive findings, involve external legal counsel early in the process. This can ensure the investigation is conducted under attorney-client privilege, shielding evidence from discovery in future legal cases [20].
Gather all relevant logs - system, application, network, firewall, and authentication logs - and document compromised credentials, unauthorized forwarding rules, and OAuth app grants. Do this before resetting access [19]. Store forensic images and logs in a secure, separate location to prevent tampering. Be aware that some insurance providers may require notification before forensic work begins, and they might mandate using pre-approved forensic firms [40].
Once evidence is collected, focus on creating a detailed record of your response. Every action should be logged with precise timestamps. For example, regulations like HIPAA require maintaining an incident log as part of compliance [20]. Include details like when the breach was discovered, who identified it, the initial symptoms, and the steps taken to contain it [6].
Use a centralized case management system to track all incident details, communications, and evidence. Assign a single person to manage the chain of custody [41][6]. For sensitive discussions, use encrypted communication channels that operate outside the potentially compromised corporate network [19].
Capture visual evidence, such as ransom messages or suspicious error screens, by taking photos with a mobile phone before isolating affected systems [6]. If third-party vendors are involved, document their access levels and verify their remediation steps. Accurate documentation not only supports compliance but also demonstrates a thorough incident response, which can help reduce fines and legal exposure. Regulators often view such documentation as evidence of "reasonable security" [41].
| Documentation Element | Legal/Regulatory Purpose |
|---|---|
| Incident Log | Complies with HIPAA and state notification laws [20] |
| Forensic Images | Supports litigation and insurance claims [2] |
| Communication Records | Verifies timely notification to regulators (e.g., GDPR's 72-hour rule) [2] |
| Chain of Custody | Ensures evidence is admissible in legal or regulatory reviews [6] |
| Remediation Actions | Demonstrates "reasonable security" to reduce regulatory penalties [41] |
A solid breach detection checklist can be your lifeline when every second counts. Companies with a documented incident response plan are able to contain breaches 54 days faster [4] and save an average of $2.66 million [2] compared to those without one. Considering the average cost of a breach is $4.45 million [42], and each hour of delay adds $45,000 [4], having a structured and swift response isn’t just helpful - it’s critical.
As Josh Amishav, Founder of Breachsense, wisely points out:
"Speed matters more than perfection. Reset compromised passwords first, then figure out how far it spread" [1].
This approach underscores the importance of acting decisively - prioritizing tasks like isolating systems without shutting them down, capturing logs before resetting credentials, and engaging the right teams immediately. These steps can turn a potentially catastrophic breach into a contained incident, setting the stage for ongoing security improvements.
Containing a breach within 200 days can save over $1.1 million [19]. But preparation doesn’t stop at creating a checklist. Regular tabletop exercises, keeping contact lists updated, and conducting post-incident reviews within two weeks of any event ensure your checklist evolves into a proactive defense tool. For growing businesses, advisory support from firms like Phoenix Strategy Group can further strengthen your response strategy.
Fast-forward to 2026, and the landscape becomes even more challenging. AI-accelerated attacks have reduced attack timelines from days to mere hours [6]. Automated threats can map and exfiltrate data in record time, making it essential to keep your checklist accessible, define clear team roles, and remember that 80% of organizations that pay ransoms are targeted again within 12 months [6].
The question isn’t whether a breach will happen - it’s whether you’ll be ready when it does. With this checklist and a commitment to continuous monitoring, you can detect, contain, and recover faster than most organizations, turning what could be a disaster into a manageable incident. This checklist is your first step toward transforming chaos into control.
When dealing with a breach, the priority is immediate containment and assessment. It's crucial to act quickly but carefully to avoid losing critical evidence. Here’s what to do:
These steps are essential for controlling the situation and laying the groundwork for an effective response.
When a system is compromised, isolating it without shutting it down is crucial to preserve key forensic evidence like volatile memory and logs. These elements are vital for understanding the breach, pinpointing the attack vector, and assisting with legal or regulatory investigations. Powering down the system or deleting files can permanently erase this valuable data. Instead, disconnect the system from the network to stop the attack from spreading, while keeping it powered on for detailed analysis.
In the U.S., the deadlines for reporting data breaches differ from state to state, generally falling between 30 and 90 days. Certain states, such as California, mandate notification to affected parties "without unreasonable delay." It's important to check the specific requirements for your state to stay compliant and ensure reports are made on time.